Wednesday, December 29, 2010

GreenStitch Episode 18 - Fleece and sergers

Haven't heard this episode yet? Link up right here.

Won't some sweet little baby be warm and snug heading home from the hospital in this fuzzy wrap?Above, you can see the little hood looks before finishing. You just stitch straight across (conventional machine!) about four inches down from the top, and cut fringe down to that stitching line. Cinch a little ribbon around it to bunch up the fringe, and you're done.

You can also see in these photos in how the serger makes quick work of the finishing. The pattern (get it here or here) also suggests finishing with a colorful binding, which would be really cute. In this case, I wanted to get them done and donated quickly!


Here's the stuff about the hat I was trying to describe. First, cut a 12-inch-wide strip as long as the circumference of the head you're trying to fit -- make sure the stretch goes WITH the circumference. For a newborn, make the strip between 12 and 14 inches long. Scale up the length and the depth for larger sizes.

Above, you can see, along with my charming and non-manicured thumb, how I've serged the ends together and pinned the tube so the seam is in the middle back.
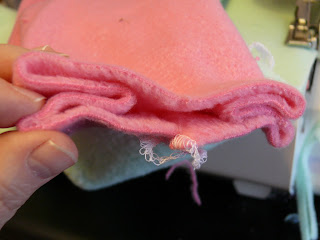


Now just poke the side seams inward to form little pleats. No special measurements necessary. Stitch across the top to hold the pleated seam in place.

Turn a very deep hem to the inside of the hat and machine-stitch in place, using your conventional machine (i.e., not the serger.)

Here's how those cute little pleats look from the top.

The lighting, obviously, was bad when I took this shot, but here are some of the little hats in a row.


And, I went a tad overboard on shooting photos of the catnip mice, but gee, they turned out cute! My cats just love theirs, which are similar to these. I'm keeping these particular models up on the shelf, as I might put them on the much-neglected Etsy shop later.

I must tell you about the whiskers. When I made the set for my cats, it was Christmas Eve and I was scouting around for black embroidery thread or something similar so the mice could have whiskers. Of course I was out...but right on the kitchen counter was one of those plastic net sleeves they put around wine bottles. Imagine something like that sitting around my kitchen! :-) A few snips - instant whiskers!

As always, thanks very much for listening! Please leave a comment or e-mail me if you have suggestions - I always love hearing from listeners.

Sunday, December 19, 2010

GreenStitch Episode 17 - Crispina ffrench interview (and more!)


Merry Christmas! Thanks for making a little time during this busy holiday season to listen to Episode 17!

I've learned so much about felting and recycling sweaters from the Sweater Chop Shop, so it was terrific to have a chance to visit with author Crispina ffrench. Here are a few links that can tell you more about Crispina.


UPDATED 12/23: Here's a shot of the felted wool stocking, made from a recycled Old Navy wood sweater.


Also mentioned in this podcast:

Here's the cute Christmas ornament from the clever gals at my quilt guild party. There are tons of fun things happening out there with fabric selvages. These were foundation-stitched to a thin piece of batting and a solid backing fabric. Outside edges are raw, with just one row of topstitching about a quarter-inch from the edge. Everyone loved them!

Listener Valerie (scrooquilt) sent these photos of tote bags made from cleaned-out birdseed bags. That heavy-duty plastic will make for a durable shopping bag - great idea, Valerie!

Finally, here's the link to the great fabric gift wrapping (and tag-making) ideas.


This link came to me from Darla at the Scientific Quilter - thanks, Darla! (and if you're not a fan of Darla's yet, please get yourself over there and listen - she's great!)

Sunday, December 5, 2010

GreenStitch Episode 16 - I felt like it

I was all over the map in today's podcast! Tune in to the episode here.


OK, so my reconstructed sweater vest really looked a lot cuter on than it does here! It really was so warm and cozy. I think I'm going to add a couple of buttons and loops for front closure. I've made one more but I haven't taken a photo. Can't wait to make more!

Other links from this podcast:


Tuesday, November 30, 2010

GreenStitch Episode 15 - A chat with Charity

What fun to visit with Charity Beasley, the wonderful creator and author of Indie Tutes! Listen to the full podcast episode here.

Don't you love the Fair Weather Jacket from Charity's pattern line? Find the pattern on her Etsy site (link below)

Enjoy these links from the episode:


Also:

Thanks, Charity, for sharing your thoughts and inspirations!

Sunday, November 21, 2010

GreenStitch Episode 14 - Eco-scarves

In today's episode (listen here!) we take a look at easy scarf projects. Because, at least here in New York State, it's getting cold out there.

The more I'm around this scarf, the more I love it. The shirring with the elastic thread is just so easy to do when you follow Erin's great tutorial. Yes, the tutorial is for a sundress, but the shirring technique is easy to adapt to any project. You can do it, I promise. (Here's the main link to House on Hill Road.)

Here's the dress that yielded the fabric for the ruffled scarf. Isn't it horrible? As in, really-and-truly, total-crime-of-fashion horrible? Don't worry. Like the parrot in the old Monty Python sketch, "It is no more. It has CEASED to BE."

Ah, the T-shirt scarf. So cozy, so casual, so versatile. Am definitely going to try onion-skin dying a white one with some lacy appliques on it. I just think you can't have too many of these. Would also be cute to insert narrow ruffles in the seams.


Here's the flannel-shirt scarf, pockets and all. I look really carefully at the flannel before I make these. Sometimes the older flannel has a lot of pills from wear, and you don't want those scratching around on your neck.

This one didn't photograph all that well on this overcast day, but you can get a little sense of the drapey cowl out of velvet and sparkly sweater knit. Get the instructions for this Erin Harris design in the current issue of Stitch magazine.


Here's the finished Project Night Night quilt. Keep up with all the results of the project over at the Quilted Cupcake.

Other links from this podcast:


Finally, here's a shot of Mr. Leo, who wandered through in mid-podcast. After he realized it wasn't playtime, he headed to his basket for a nap.

Saturday, November 13, 2010

GreenStitch Episode 13 - Be a Wrap Star

Haven't heard the episode yet? This click will take you there.

Here's a loaf of bread in all its dollar store tea-towel finery -- I just used large hand-basting stitches and the bag looks dandy. And the bag for the jelly jar will be a great size for someone else to use for a small gift.
Here's another tea towel dressing up a loaf of bread. I really can't believe I'm lured in dollar stores from time to time - the siren song of the inexpensive tea towel is powerful indeed.

Even a small box can look pretty good wrapped in a tea towel. I had this red lace in my stash from some eBay assortment of trims I got ages ago. Since I'm not needing to decorate a bordello anytime soon, the wide red lace lent itself nicely to some gift-wrapping.


Wine bags of various origins. I think I'll stick with the ones made from cloth napkins.

Meet the Morsbags! These are just a few of the batch that I've made. I smile when I look through this stack and remember how all these bags started out -- some pillow covers from the Salvation Army, my friend Beth's old curtains, some leftover upholstery fabric, and a cute but outdated jumper I picked up at my friend Peggy Jo's garage sale.


Other links from this episode:


Saturday, November 6, 2010

GreenStitch Episode 12 - Embellishments

Haven't listened to Episode 12 yet? Just click here!

Look how easy it is fill in a simple monogram shape with all manner of buttons! I went back and did a little editing after I took this photo -- the "K" looked a bit too much like an "H." Easily fixed. The finished accent pillow is now nestled amid other pillows on the living room couch. I made sure to sew each button on securely, since it's only a matter of time until curious little cat paws will be rubbing it, I'm sure.

Here's a look at a little machine couching with metallic embroidery thread on top of menswear wool. I'm not certain this attempt was entirely successful, but I know I'll be experimenting with it more. The juxtaposition of conservative suiting fabric with sparkly, meandering decorative thread is pretty intriguing.


My office no longer looks like the optical department at Sears since I hung this funny-looking thing Velcroed to the end of my desk. It's certainly not pretty, so I'm glad it faces the wall, but I'm also glad I no longer need to hunt around for the spectacles of the moment -- and it's been a critical component of my 5S success! (Here's a 5S link, in case you're interested.)

Other links from this podcast:


Thanks so much for listening!


Sunday, October 17, 2010

GreenStitch Episode 11 - Sew many solutions


Hope you got a few ideas for coming up with simple solutions to little everyday challenges with the creative use of recycled materials and your sewing machine. It was fun to revisit Episode 3, when our friend Ginger from Wienerdog Tricks put the idea into words!

Here's the sleeve for my new laptop, made out of a couple of thick placemats. For closure, I sewed a big flat button on either side and joined them with an elastic hair band. I must admit, I really enjoyed seeing this festive stripe poking out of my work bag last week. The little tiny bit of lateral stretch in this ribbed weave makes for a great fit.


Here's the fold-up charger/cord organizer. T-shirt scraps made the perfect stretchy pockets for various chargers and a flash drive or two. Clearly, this would not win any contests for design or craftsmanship. Did that matter to me when I could quickly and easily find all my gadgets during my recent trips? It did not!


Here's the scissors pouch, which hangs from the side of my sewing table, always at the ready. The thick ribbed weave of the placemat is easily tough enough for this task, and large knitting stitch markers make the pouch easy to hang. The lower photo shows how I boxed off the bottom. Easy!

The little camera pouch, made out of part of a hemline from an old wool skirt. I actually made several pouches out of this skirt. Those elastic hair bands come in so handy, too.

Make a very useful storage bag for your interfacing out of the plastic sheet of instructions that come with the yardage. Not rocket science, but it sure is practical.

I freely admit, the plastic-bag-dispensing shirt sleeve looks creepy -- like a dismembered Halloween scarecrow! However, if you're hanging it anywhere near your cat's "facilities," it will be a very functional addition and your cat will not complain! :)

I'm crazy about my new tote bag for my music folder, but can you imagine how this print looked when it was in its original skirt form?!

Have any useful sewing solutions you'd like to share? Just leave a comment. And as always, thank you so much for listening! See you soon.

Monday, October 11, 2010

GreenStitch Episode 10 - A podcast to dye for!

In this episode, I loved learning about natural dyes from fab fiber artist Kimberly Hall and then doing my own experiments. I'll start these show notes with the end result -- the small bag made from my old ivory silk/linen blouse, with pieces dyed in onion skins and faded flowers from my garden.

I love the raw-edged ruffles and fraying applique -- a perfect counterpoint to the formal jacquard fabric.

So the original fabric would always be handy (the better to admire the contrast with, my dear), I lined the pouch with the original ivory silk/linen fabric. Can you see the band for the wristlet here? It's the buttonhole band from the blouse.

You really want to check out Kim's great video from the Etsy labs - you won't believe how easy this process is, and she explains everything perfectly. View the video here.

And below are my results from using the process Kim describes.

Above are the muslin samples. At left is the original unbleached muslin. Following are the samples dyed with onion skins, garden flowers, and red cabbage. With the exception of the onion skin piece, pretty forgettable results.

Here are the pieces cut from the angora/lambswool sweater -- original, onion skins, flowers, and cabbage. I think I'll felt the dyed pieces up and make a BlackBerry case. (Hey! Next summer I should dye a BlackBerry case with blackberries!)

Here's where it starts to get really interesting...the samples from the blouse I got from Coldwater Creek about 10 years ago. Again, the photo above shows the original fabric, and the dyed results from onion skins, garden flowers, and red cabbage.

Finally, here are the cotton doilies ... an original white one, and samples from onion skins, flowers, and red cabbage (which doesn't look blue here in this sunlit photo, but it's really a very distinct blue shade.)

Now, for more links to the projects and exhibits Kim Hall described:


If you're in the New York City area, check out Kim's knitting workshops at the Textile Arts Center: Saturday, Oct. 16 from 2 until 5 p.m.; Thursday, Oct. 21 from 6 until 9 p.m.; and Thursday, Oct. 28, from 6 until 9 p.m.

Finally, Kim's Web site is here.

And until Oct. 15, leave a comment on the Episode 8 blog entry and get entered into a drawing for either the sewing room organization book or the Annie Smith quilt pattern.